Showing posts with label free. Show all posts

Thursday, April 13, 2017

Eco-Friendly Mesh Shopping Bag | FREE Crochet Pattern


MATERIALS

  •  Bernat Handicrafter Cotton Yarn (You could probably get
  • at least 2 or 3 bags out of a 12 oz skein)
  •  Cotton makes it durable and much easier to wash if it
  • gets soiled.
  •  Crochet Hook (I used I but gauge is not important in this
  • project so use what feel comfortable)
  •  Tapestry Needle
  •  Scissors


Abbreviations

  • ch: chain
  • dc: double crochet
  • sl st: slip stitch
  • st: stitch


Pattern
Chain 4
Row 1: 11 dc in 4th chain from hook, join to top of first chain with a sl st (12 st)
Row 2: ch 3 (counts as 1st dc now and throughout entire pattern), dc in same space, 2 dc in each st around (24 st)
Row 3: ch 3, *2 dc in next st, 1 dc in next st, repeat from * around, join with sl st (36 st)
Row 4: ch 3, dc in next stitch, *2 dc in next st, 1 dc in next 2 st, repeat from * around, join with sl st (48 st)
Row 5: ch 3, dc in next 2 st, *2 dc in next st, 1 dc in next 3 st, repeat from * around, join with sl st (60 st)
Row 6: ch 3, dc in next 3 st, *2 dc in next st, 1 dc in next 4 st, repeat from * around, join with sl st (72 st)
Row 7: ch 3, dc in next 4 st, *2 dc in next st, 1 dc in next 5 st, repeat from * around, join with sl st (84 st)
Row 8: ch 3, dc in next 5 st, *2 dc in next st, 1 dc in next 6 st, repeat from * around, join with sl st (96 st)
Row 9: ch 3, dc in next 6 st, *2 dc in next st, 1 dc in next 7 st, repeat from * around, join with sl st (108 st)
Rows 10-12: ch 3, dc in each st around (108 st)
Row 13: ch 5, sk 2 st, dc, *ch 2, sk 2 st, dc, repeat from * around, ch 2 and join to 3rd ch of ch 5 with a sl st
Row 14-17: ch 5, dc in 2nd ch 2 space, *ch 2, dc in ch 2 space, repeat from * around, ch 2 and join to 3rd ch of ch 5 with a sl st
Row 18: ch 3, *2 dc in ch 2 sp, dc in dc, repeat from * around, join to first ch 3 with sl st (108 st)
Row 19: ch 3, dc around, join with sl st (108 st)
Rows 20-24: repeat rows 13 and 14
Rows 25-26: repeat rows 18 and 19
Row 27: ch 40, sk 22 st, sl st, dc in next 30 st, sl st in next st, ch 40, sk 22 st, sl st, dc in next 30 st, sl st in next st
Row 28: ch 3, dc in sl st, dc up the ch, in sl st at base of ch, over the next 30 dc, in the sl st at base of 2nd ch, up the 2nd ch in the sl st at base of 2nd ch, across the next 30 dc, join to ch 3 with sl st (144 st)
Row 29: ch 3, dc around, join with sl st (144 st)
Tie off and sew in ends and you’re
ready to go shopping!!!

Saturday, November 28, 2015

Simple Men's Hat | FREE CROCHET PATTERN


I'm crafting my Christmas presents, so that means writing simple and quick patterns because I want to churn out my gifts quickly (procrastinator to the extreme!) but I'm too pretentious to take the easy route and use someone else's pattern. It's not unique, but since I'm not looking at anything it's probably juuuuuuust original enough to post.

For this hat you need a size J hook (smaller or larger depending on head size and tension) and one skein of Red Heart Super Saver yarn. I used Charcoal for this project.

MAIN HAT
ch 4
RND1: make 11 dc in 4th ch from hook, join w/ sl st (12 st)
RND2: ch 3, dc in same sp, 2 dc in each st around, join w/ sl st
RND3: ch 3, dc in next st, *2 dc in next st, dc in next 2 st, repeat from *, join w/ sl st
RND4: ch 3, dc in next 2 st, *2 dc in next st, dc in next 3 st, repeat from *, join w/ sl st
RND5: ch 3, dc in next 3 st, *2 dc in next st, dc in next 4 st, repeat from *, join w/ sl st
RND6: ch 3, dc in next 4 st, *2 dc in next st, dc in next 5 st, repeat from *, join w/ sl st
RND7: ch 3, dc in next 5 st, *2 dc in next st, dc in next 6 st, repeat from *, join w/ sl st
RND8: ch 3, dc in next 6 st, *2 dc in next st, dc in next 7 st, repeat from *, join w/ sl st
RND9-14: dc around, join w/ sl st (72 st)
f/o

BAND
ch 10
R1: sc in 2nd ch from hook, sc across (9 st)
R2-72: [BLO] ch 1, sc in same st, sc across
ch1, hold ends of band together and sl st it together, do not f/o

ASSEMBLY
Turn hat inside out, place band around the bottom and sc it to the main hat. Turn hat rightside out and flip the band up, concealing the sc row inside


Saturday, April 4, 2015

Happy Easter! (Free Bunny Crochet Pattern)


Since tomorrow is Easter, I thought I'd work up a quick little pattern to share. It is possible to work this little guy up in under two hours!

What you will need:

  • 1 skein white yarn
  • size F crochet hook
  • poly-fil 
  • 16 mm safety eyes in pink (which I purchased here)
  • tapestry needle
  • scissors

Ears (make 2)
ch 2
1: make 6 sc in 2nd ch from hook
2: make 2 sc in each st around
3-7: sc around
8: dec over next 2 st, sc in next 4 st, dec over next 2 st, sc in next 4 st
9: dec over next 2 st, sc in next 3 st, dec over next 2 st, sc in next 3 st
10: sc around
Do not stuff, sew onto head

Arms (make 2)
ch 2
1: make 6 sc in 2nd ch from hook
2: 2 sc in each st around
3-8: sc around
Stuff and sew onto body

Legs (make 2)
ch 4
1: 2 sc in 2nd ch from hook, 2 sc in next 2 st, going down other side of initial chain, make 2 sc in next st
2: *sc in next st, 2 sc in next st, repeat from *
3: *sc in next 2 st, 2 sc in next st, repeat from *
4: *sc in next 3 st, 2 sc in next st, repeat from *
5: sc in next st, dec over next 2 st, dec again, sc around
6: make 3 dec over next 6 st, sc around
7: dec, sc around, dec over last 2 st
8: dec, sc around
9-11: sc around
Stuff and sew onto body so that bunny is in seated position


Head and Body
ch 2
1: make 6 sc in 2nd ch from hook
2: 2 sc in each st around
3: *sc in next st, 2 sc in next st, repeat from *
4: *sc in next 2 st, 2 sc in next st, repeat from *
5: sc in next 3 st, 2 sc in next st, repeat from *
6-9: sc around
10: *dec over next 2 st, sc in next 3 st, repeat from *
11: *dec over next 2 st, sc in next 2 st, repeat from *
12: *dec over next 2 st, sc in next st, repeat from *
13: sc around
14: *sc in next st, 2 sc in next st, repeat from *
15-16: sc around
17: *sc in next 2 st, 2 sc in next st, repeat from *
18-19: sc around
20: *sc in next 3 st, 2 sc in next st, repeat from *
21-22: sc around
23: *dec over next 2 st, sc in next 3 st, repeat from *
24: *dec over next 2 st, sc in next 2 st, repeat from *
25: *dec over next 2 st, sc in next st, repeat from *
Stuff at this point
26: dec all around
Draw closed

Tuesday, March 3, 2015

The Rosette Beanie


I designed this pattern and then my coworker asked for a version made in red, which features alterations to the original pattern. I called it the rosette because the motif on the top reminds me of stained glass windows.

tr9tog: y/o twice, insert hook in stitch, pull through, y/o and pull through twice, repeat in next 8 st, y/o and pull through all loops on the hook

I used an H on hers and I think an I on the one pictured.

Row 1: ch 4, 11 dc in 4th chain from hook (12 dc)
Row 2: make 2 sc in each st around (24 st)
Row 3: *ch 12, sc in next 2 st, repeat from *
Row 4: make 16 sc in each loop
After this row, changes were made the pattern. The red version will show these changes as compared to the teal.
Row 5: sl st to 4th sc (switch colors here if you wish), sc in 8 st, *ch 3, sk 8 st, sc in 8 st, repeat from *
The chain three between loops was not in the original pattern

Row 6: sl st in next 5 st, ch 4 tr8tog, ch 16, skip 2 st, tr9tog
It was originally tr8tog but I had to make allowances for the extra stitched made by the chain three spaces


After row 6, everything is as it is in the original pattern
Row 7: (switch colors again if desired) ch 3, make 19 dc in ch 16 space, *20 dc in next ch 16 sp, repeat from *
Row 8: (switch colors again if desired) 4 sl st, *12 sc, sk 8, repeat from *
Row 9: sl st to 5th st, ch 3, dc in next 3 st, *ch 4, skip 8 st, dc in next 4 st, repeat from *
Row 10: sc around
Row 11: (switch colors again if desired) dc around
Rows 12-15: sc around (I alternated colors every other row)

Monday, September 1, 2014

Cool Spectrum Cable Infinity Scarf


This cowl is excitingly chunky and easy to make!

Crochet Hook I | Bernat Super Value Prints in Galaxy | Caron 4-ply worsted in White
How to FPDC: yarn over and insert your hook behind the dc below, draw up a loop and dc as normal. It should push the dc below forward.

ch 20, join to first ch with sl st to form loop (200 st around) careful not to twist it!

Row 1: ch 3 (counts as 1st dc), dc in next ch and in each ch around, join w/ sl st (200 dc) (keep it from twisting)
Row 2: ch 3 (counts as 1st dc), fpdc in next st, *dc in next st, fpdc in next st, repeat from * around, join w/ sl st
Rows 3-5: repeat row 2
switch to white
Rows 6-9: repeat row 2
switch to variegated
Rows 10-14: repeat row 2
Rows 15-24: repeat rows 6-14

Tuesday, August 12, 2014

Vintage Crocheted Cape


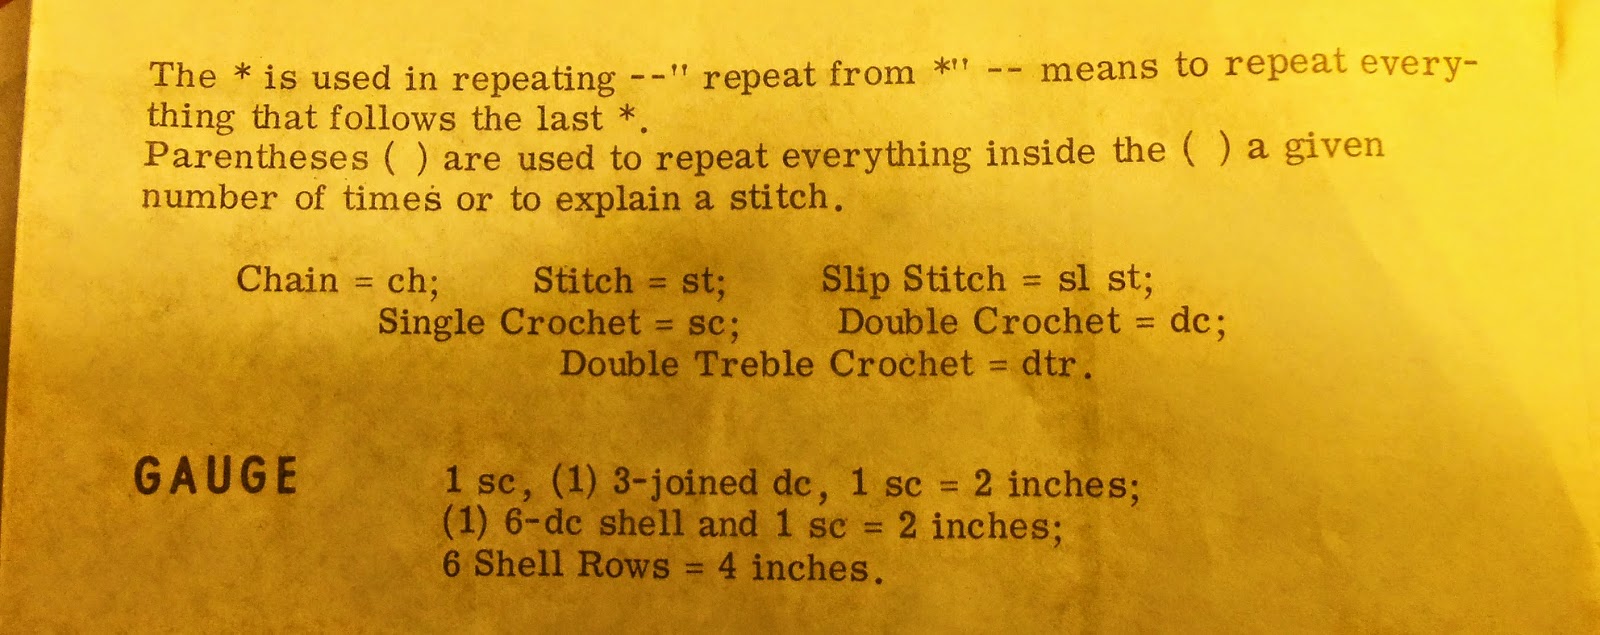
My grandmother handed me this pattern the other day, with its aged yellow paper, and asked if I would make her this cape. She's the one who taught me to crochet a little over 11 years ago, and she loves seeing my work. She especially likes the shawls I make for her, and is always telling about the compliments people give her for them at church and in the grocery store. I tried my hardest to find a date on this, but I couldn't find one. My grandmother said her mother gave it to her, and that it's from the 70s. If you wanted to buy books from the company that published this pattern it only cost 50 cents!

I have photographed the pattern for you below:


Tuesday, August 13, 2013

Welcome to Night Vale Applique | Free Crochet Pattern


Due to some infiltration threats from that nasty, awful town Desert Bluffs, all Night Vale citizens are required to wear this symbol on their clothing, or, preferably, sewn onto their foreheads, so the Sheriff's Secret Police can distinguish good, law abiding Night Vale citizens from those nasty, awful, infiltrators from Desert Bluffs. These symbols will not be provided and must be crocheted by the wearer. Please note that crochet hooks are still illegal in Night Vale, as are yarn, needles, and thread.


Base:
ch 18
Row 1: sl st in 2nd ch from hook, sc in next 2 ch, hdc in next 2 ch, dc in next 2 ch, tc in next 3 ch, dc in next 2 ch, hdc in next 2 ch, sc in next 2 ch, sl st in last ch
Row 2: ch 1, and moving down other side of ch, sl st in 1st ch, sc in next 2 ch, hdc in next 2 ch, dc in next 2 ch, tc in next 3 ch, dc in next 2 ch, hdc in next 2 ch, sc in next 2 ch, sl st in last chain
tie off

Iris: 
ch 2
Row 1: make 6 sc in 2nd ch from hook, slide bobby pin or other stitch marker in first sc to mark your place, do not join, do not pass go, go directly to jail
Row 2: make 2 sc in each st around (12 st)
tie off

Shine:
with a significantly smaller hook (I used a G for the 1st two parts and used a D for this part) ch 6
Row 1: sl st in 2nd ch from hook, sc in next 2 ch, 2 sc in next ch, sc in next 2 ch, sl st in last chain

Assembly: using ancient black magicks attach the white crescent moon shape to the iris, then attach the iris to the middle of the base. Sew symbol onto forehead.

Friday, August 9, 2013

Breakfast Scarf | Free Crochet Pattern


Materials:
Crochet Hook (I used J)
Tapestry Needle
Red Heart Yarn: Burgundy, Cream/offwhite, White, Yellow
Special st: dc2tog [yarn over, insert hook in space, draw up a loop, yarn over, draw through 2 loops on hook. skip one space and yarn over and insert hook, draw up a loop and through 2 loops on hook, draw through remaining 2 loops][takes up 3 spaces]
Eggs: Make 5

White: ch 4
Row 1: 11 dc in first st, join with sl st (12 st)
Row 2: ch 3, dc in same st, 2 dc in each st around (24 st)
Row 3: ch 1, 2 sc across, 2 dc in next st, Hdc into next 2 sts. Work 3 dc into next st, then hdc in next st. Dc twice in next st, then dc in next st. Hdc in next 3 sts. 3dc into next st. 2dc into next st. Hdc into next 2 sts, then sc in next 3 sts. 4dc into next st, hdc into next st, and then sc in next 2 sts. 3hdc into last st of round, join with sl st and fasten off, leaving a long tail so you can use it to sew egg onto scarf.
Yolk:  worked in the round so get a stitch marker (I like to use a bobby pin)
Yellow: ch 1
Row 1: ch 1, 6 sc in ch, do not join (6 st)
Row 2: 2 sc in each st around (12 st)
Row 3: sc around, join with sl st and leave long tail (12 st)
Assembly: Use long tail of yolk to sew yolk onto middle of egg white

Scarf:
With Burgundy, Ch 238
Row 1: dc in 4th ch from hook, dc in next 8 ch (should =10 dc), *3 dc in next ch, dc in next 10 dc, dc2tog, dc in next 10 ch, repeat from * across
Rows 2-5: ch 3, dc in same st, *10 dc, 3 dc in same st (should be at the middle of the previous 3dc), 10 dc, dc2tog repeat from * (eventually the ending part will get longer than 10 dc) 
SWITCH TO CREAM
Rows 6-7: ch 3, dc in same st, *10 dc, 3 dc in same st, 10 dc, dc2tog repeat from *
SWITCH TO BURGUNDY
Row 8: ch 3, dc in same st, *10 dc, 3 dc in same st, 10 dc, dc2tog repeat from *
SWITCH TO CREAM
Rows 9: ch 3, dc in same st, *10 dc, 3 dc in same st, 10 dc, dc2tog repeat from *
SWITCH TO BURGUNDY
Rows 11: ch 3, dc in same st, *10 dc, 3 dc in same st, 10 dc, dc2tog repeat from *
Fasten off, attach eggs using long tail of white approx 11/12” apart

Crochet Roses | Free Crochet Pattern

Who doesn't love roses? This pattern will show you how to crochet roses in 3 different sizes for all your be-flowering needs.


Bud
ch 43 (make sure there is a long tail hanging off of your starting loop)
Row 1: dc in 5th ch from hook, *ch 2, skip 2 st, dc, repeat from *
Row 2: ch 3, 2dc, ch 1, 2 dc in each ch 2 space
Tie off (leave a long tail) and follow assembly instructions

Medium
ch 43 (make sure there is a long tail hanging off of your starting loop)
Row 1: dc in 5th st from hook, *ch 2, dc in same st as first dc, ch 1, skip 2 st, dc, repeat from *
Row 2: ch 3, *6 dc in ch 2 space, sl st in ch 1 space, repeat from *
Tie off (leave long tail) and follow assembly instructions

Large
ch 73 (make sure there is a long tail hanging off of your starting loop)
Row 1: dc in 5th ch from hook, *ch 2, skip 2 st, dc, repeat from *
Row 2: ch 3, dc in first ch 2 space, ch 2, dc in same space, *ch 1, dc in next ch 2 space, ch 2, dc in same space, repeat from *
Row 3: ch 3, *6 dc in ch 2 space, sl st in chain 1 space, repeat from *
Tie off (leave long tail) and follow assembly instructions 

Assembly: Roll petals up (right side out) and use one of the long threads hanging off either side to sew all through the bottom, making sure your needle goes through all the layers. Use the other long thread to affix rose to a pin, or a hair tie, or use floral wire to make a stem!
Pro Tip: You can use treble crochet for taller petals!